Showing posts with label tutorial. Show all posts

Friday, 19 September 2014

Scales Cushion Tutorial Part 2

This is the second (and last!) part of the Scales Tutorial. The first part can be found here. Also, have a look at all my Black and White Cushions and the corresponding tutorials!

Still Sewing

Last time, we left off at this stage:

The blocks from Tutorial 1

You've measured them and made sure that they're all about the same size, ideally 11.5". Now divide that measurement by two (5.75") and cut the block into four equal squares. Make sure that the black middle square is about 1" big in all four pieces. Cut the other five blocks as well.

Block cut in 4

Now it's time to add the 1" black sashing strips. Put one of the strips under the pressing foot of your sewing machine, then add one of the small squares underneath this strip. Make sure that the black middle square is to the bottom right. Repeat this for 18 of the blocks, leaving 6 without a sashing strip. Then sew these blocks together, keeping them all in the same direction:

Sashing added between Blocks

You'll need two strips of 6 blocks, two of 4 and two of 2 blocks. Make sure the blocks without the sashing strip are at the end of the strip.

Finished strip sizes, two of each

Now you arrange them (counting the blocks in a strip) 2-4-6-6-4-2 on point. Add sashing between the different strips on the longer side of the two joining strips (blue arrows). On one of the middle strips with 6 blocks you'll have to add a sashing strip on both sides (green arrow).

Where to Add Sashing between the Strips
 
First, sew them together in pairs, then sew the different pairs to one whole piece. You can make sure that the sashing strips align perfectly by marking the connecting points and pinning the two sides together.

Press the seams towards the light, so that the sashing strip lies flat on the back.

Pieced Top Finished

Now all you have to do is cut the piece to size (20"x20"). I started off by cutting down the left side of the piece (blue line) and then the top (green). Then I measured 20" on the two remaining sides.

Measure at least twice before you cut and make sure you have nice 90° angles. If you misscut, you might have to start from the beginning again! (No pressure! *lol*)

Cutting Down to Size

And this is how the 20"x20" piece looks like:
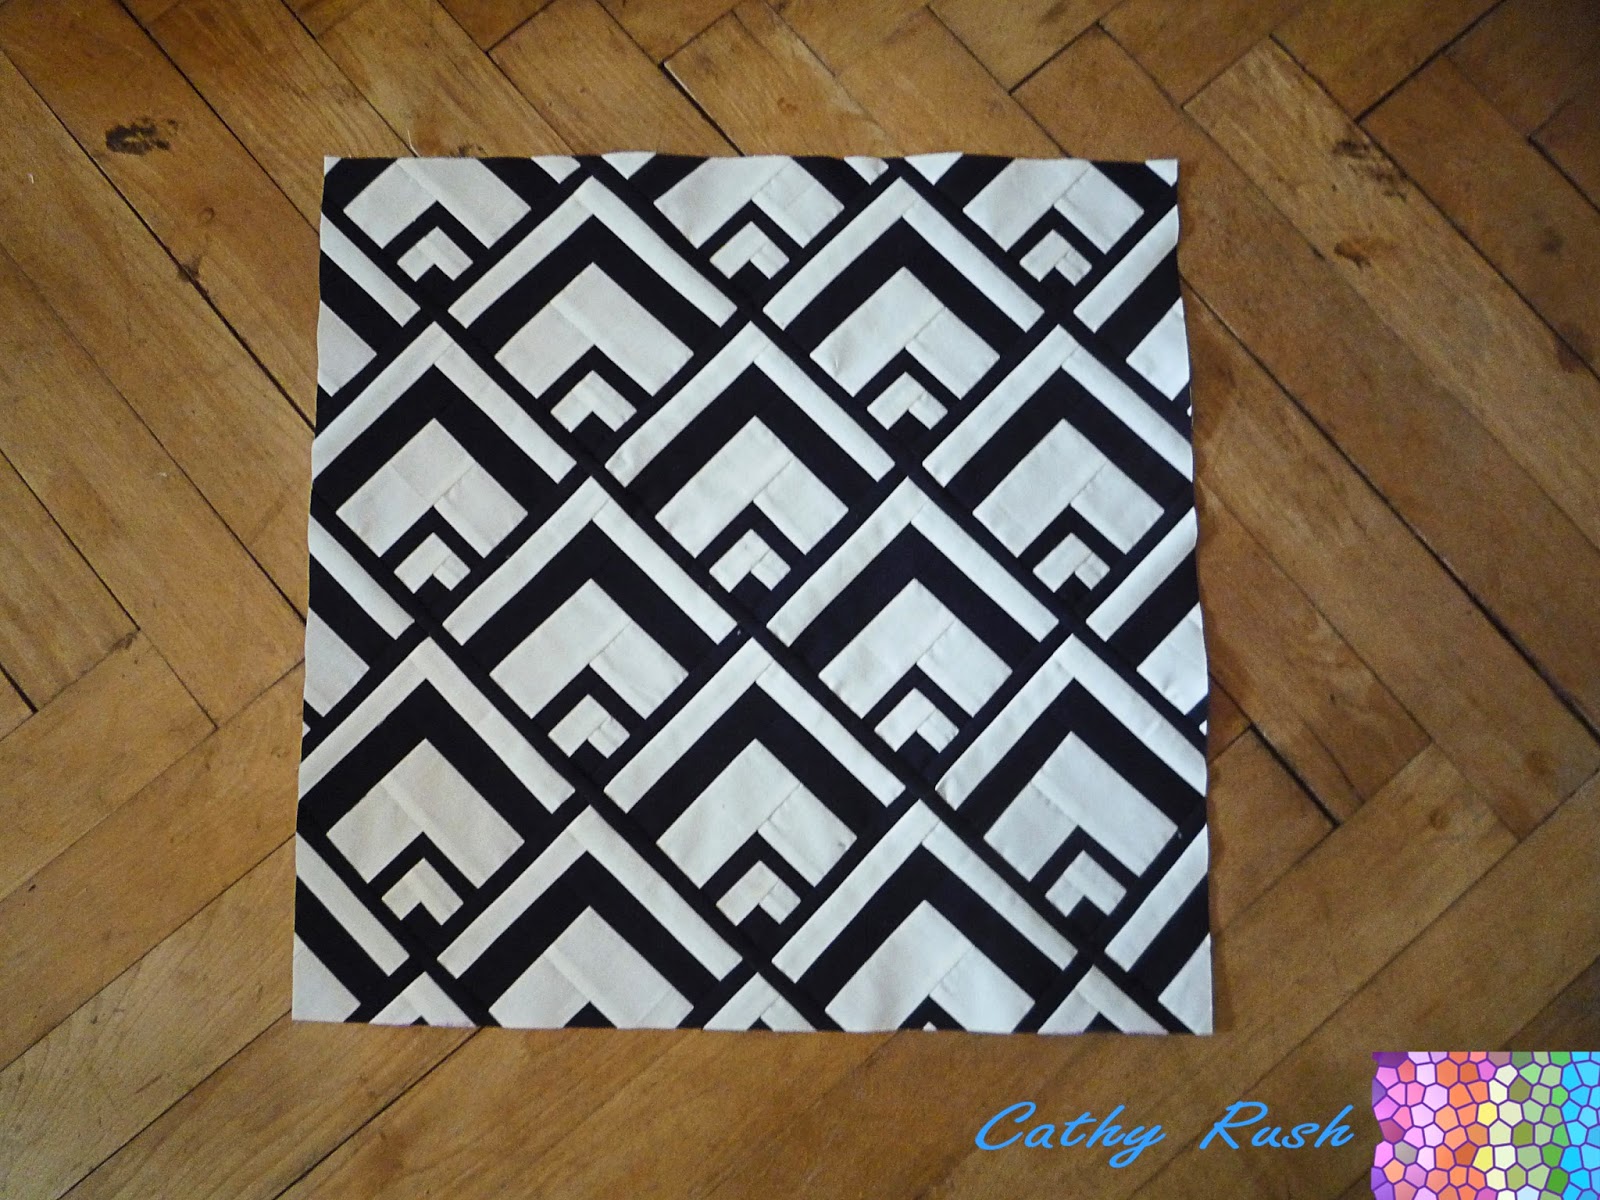
Cushion Top Finished

Now you can add a batting of your choice and "quilt it as desired". I kept it simple and just SITD along both sides of the sashing to attach it to the batting.

For the back of the cushion cut two pieces the  20"x26". Press them in half (20"x13") and topstitch along the folded line about 1/4" in. Lie the two pieces on top of the quilted Scales piece, so that they overlap in the middle. Stitch along the the outside (also with a 1/4" seam allowance). You might want to go back over and secure the corners and especially the overlap of the two back pieces, as these are the stress points.
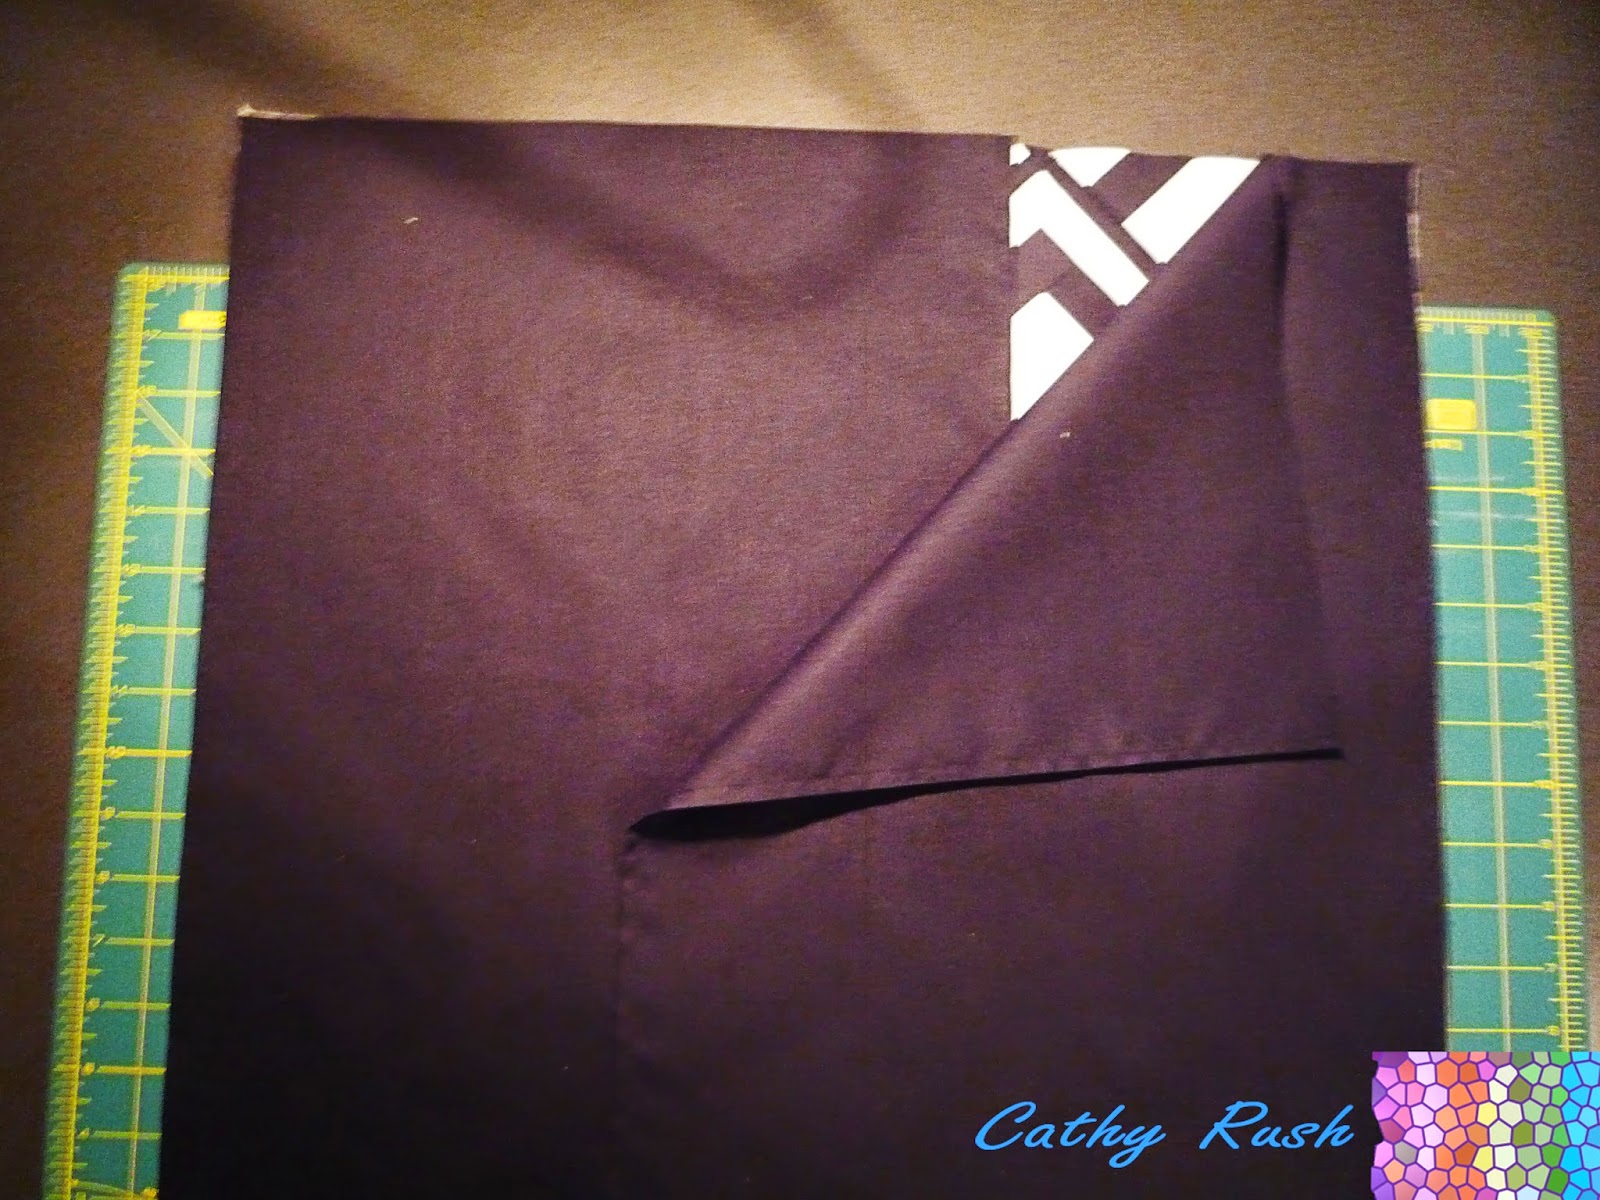
Adding the Back of the Case

Turn it inside out and put a cushion in it and voilĂ , here is your finished pillow:

Finished Scales Cushion


Have fun recreating the same or similar pillow cover! And make sure to share it with me!


All the best,
Cat.


Tuesday, 19 August 2014

Cushion Tutorial: Black and White Rectangles

Hi there!

Today I'm sharing with you a little tutorial for a cushion cover with rectangles. You could of course also enlarge it for a whole quilt if you wanted.

What inspired me to make this was actually a wallpaper I saw somewhere.


Fabrics Needed

You'll need two different fabrics. I used black and white, but of course you can use whichever two solids you like - or even prints (best would be small prints, as the pieces are too small to see bigger designs).

Cutting and Sewing

Cut 3" strips from both fabrics, then cut them up into 3" squares. It depends on the size of the pillow you need to cover, mine was 50cm x 50cm (20" x 20"), so the instructions are for that size. But you can easily adapt them for your own pillow.

You'll need about 4 strips per colour, which yields at least 50 3" squares (or 100 total).


Lay at least one black and one white square on top of each other (I did it with 2 each, it gets too tough with more than 4 layers for me). Mark the white square both on the top left and the bottom right one inch from the corner (example on the left in picture). Then place your ruler on both those dots and cut the squares in half. If you're using one sided fabric then you need to cut 22 of each fabric as mirror image (example on the right). If you're using solids or any other fabric that looks the same on both side, you can just flip them whichever way you need them to be!


Now lay out your cut pieces by exchanging one side with the opposing colour. You'll need 55 blocks like the one on top and 44 of the one on the bottom.


 To sew them together, pick the two pieces up and overlap them slightly:


I actually eyeballed it, but you can also measure them. Of course, that'll take quiet some time, after all, you're making 99 blocks!

To help you with eyeballing it, here's my tipp: Your needle/seam should go into the angle where the two pieces meet (red line), which should be 1/4" from the straight edge of the two fabrics (blue line).


You can chain piece them all, but make sure you make two different piles for the two different blocks. This makes assembly far easier! Press all seams to the dark side.

Now take one block from each pile and sew them together. Make sure the colours are always opposing. They should nest nicely, so no pinning is needed!


After sewing them all into twos, you should have eleven left from one type of the blocks. Sew them to eleven sets of two.

(For the cushion, I actually sewed them together the other way around,
starting with them bottom ones, see below!)


It's best if you lay out all the columns so that you don't mix them up! Add two sets of twos to another, making sets of four, add them to another set of four, add to each one of the sets of three (Sorry, I forgot to take pictures of that whole procedure).

Remember, you'll need 11 identical columns with 9 blocks each. All of them have to start with the type of block you made 11 more. For example, I always told myself "small black top left corner" as a reminder that I had to start all my columns (and therefore also all sets of two, etc.) with a block that looked like this:


Once you've finished your eleven strips of nine, take them to your ironing board. Press the seams in 5 of the strips towards the top, and the seams in the other 4 strips to the bottom. Make sure they don't bend and stay as straight as possible.

Take a strip each and sew them together. The seams should nest, as the seams go in opposite directions. Repeat 3 times. There's one strip left over. Now add the strip sets of two to another strip set, etc.

You'll end up with a rectangular shape. Cut back all sides symmetrically so that you end up with a square shape:


I added a cotton batting to the back and did some SITD, but, again, that was basically just to attach it, not to add structure. The backing was added as described in a previous post, with two pieces cut 20" x 26".

And that's how it looks like finished:


Front of the Rectangle Cushion


Back of the Rectangle Cushion


I hope the explanations are clear. If not, feel free to ask! :)


All the best,
Cat

Monday, 14 July 2014

Latest Projects and Pillow Tutorial

Hi there!

After being on an involuntary sabbatical (I had to bring my machine to the doctor; she's as good as new, thanks for asking!), I am back at my machine, sewing up a storm!

This weekend I finished this top:


It's my own design. I call it "Endless Stars". There might be a tutorial in the future if you ask nicely! :P

However, the fabric I want to use for the backing has not yet arrived (I simply looooove creative quilt backs!), so I had to keep myself busy with another project.

I decided to finally tackle the embarrassment that is in my living room:


See the pillows?


Yeah, not pretty (but pretty embarrassing), I know! And that's after fluffing them up...
Welcome to student living! *lol*

I recently bought some pillows at the Big Great Swede that I intend to cover with my own pillow cases. It's also a good possibility to try out some of my design ideas, as it is smaller so there is not that much waste if something goes horribly wrong. Another added bonus is of course that it is also much quicker to make! *lol*


Pillow (or Cushion?) Case Tutorial

For the small pillow (35cm x 35cm, or ca. 13.5" x 13.5") I used the four sample blocks from my DD4P tutorial. I just added a poly batting I had left over from another project and quilted it lightly. It's really more to attach than add a lot of structure:


For the back of the pillow, I cut a 13.5" strip of black fabric and cut two 17.5" pieces. Then I pressed them in half with my iron and topstitched down the folded line. When you overlap them and put them on the top right sides together, you only need to sew around and trough all the layers to get an easy envelope pillow. For a more detailed tutorial on how to make the back, see Crazy Mom Quilts' tutorial.

And this is how the cushion looks like:

Diagonal Disappearing Four Patch Cushion


I'll be making some more cushion covers in the near future. But I'm not sure yet if I'll make them all in black and white, or if I'll add a colour or two... What do you think?

All the best,
Cat


P.S: I'm really sorry for the bad pictures, but badly lit apartment + crappy camera = very bad pictures! :(

Friday, 27 June 2014

Disappearing 4 Patch Variation

Hi again!

Some time ago I saw Jenny Doan's tutorial on the Disappearing 4 Patch (D4P). If you're into using precuts, check out her other tutorials, but be aware that your to-do-list might easily double. Click at your own risk, don't blame me, I was nice enough to warn you!

Anyway, the finished D4P block looks like this:


This tutorial is a variation on that block, which I call DD4P (Diagonal Disappearing 4 Patch).

And here is how you make it:

Fabrics Needed

You need at least two different fabrics. But if you have a nice charm pack or even a layer cake at home, that'll look great combined with a matching solid.

Cutting and Sewing

If you're using yardage, cut 5" strips the width of the fabric and sew two strips together. Press the seam to the dark side. Then cut 5" pieces from these strips.


Take two of these pieces, flip one over, so that it forms a 4 patch. Sew them together and press to one side (it doesn't matter which one). I then squared them up (4.5" from the middle) just to make sure they're all the same size.


If you're using charm packs or layer cakes, you'll have to sew them together individually, but you can at least chain piece them.

Now to the trickiest part: Make four cuts (red lines) 1" away from the diagonal (blue lines). Check at least twice that your ruler is lined up properly before cutting, as you can't uncut it!


Take the four long corner pieces and exchange them:


Now sew the block back together. Be careful when handling these pieces, as you are working on the bias. So no excessive tugging!
 
First, sew the white longer strips to the small hourglass in the middle, then the two triangles to the black strips. Make sure that they line up on top. Don't worry about the bottom, we'll get to that in a bit!
 
Press the seams on the two triangles towards the black middle strip and the seams on the middle piece outwards. Now you can nestle the seams, when you sew the three pieces together. I pressed the final two seams open to reduce the bulk in the middle of the block.


Now for the final squaring up: Line up the middle seam at the 3.5" mark and also make sure that the vertical seam is perpendicular. Then cut off the fabric on the side. Rinse and repeat on all sides.

 
And here is your finished block. It's 7" unfinished and 6.5" finished.


Tipps and Tricks

 
There are just a few things that I'd like to add:
  • Make sure you don't handle the pieces too much, as everything is on the bias.
  • Press carefully, you don't want to distort the pieces.
  • Don't cut too many blocks at once, it'll just cause chaos and you don't really want to waste time finding the matching pieces.
  • Use pins when sewing together the three pieces of the block. The seams do nestle nicely, but the ends aren't straight, so you don't want them slipping around.
  • You can basically adapt the size of the block to any measurement you like, be it 6" or 10" or even bigger. Just be aware that a 4 patch with 10" squares gets quite big and easily outgrows your cutting mat or ruler! Also, if you choose bigger squares, you might want to adjust the width of the diagonal cuts. I personally wouldn't go much smaller than 5" squares, as it might get quite fiddly and practically make the hourglass in the middle disappear.


Layout Ideas

There are two possible ways to lay out your block. This is the first one:


Here is a mock up with these colours for a bigger quilt:


Or maybe you prefer a more colourful option:


Or how about a more pastelly approach:


Here is the example for the second layout:
 
 
You just have to turn two of the blocks around so that the same colour meets up in the middle and forms a secondary design.
 
That's how it would look like on a bigger scale and with some more colour:


I couldn't resist and also made a mock up with borders:


As Jenny Doan would say: Isn't that a darling quilt?!
 
I hope you like it and try it. I'd love to see a quilt with this pattern!
 
 
All the best,
Cat


Monday, 23 June 2014

Lady Edith's Rectangles


When Inspiration Hits

I was surfing the other day and of course I ended up oggling all the pretty fabrics that can be found online. One fabric line that always catches my eye is Andover's Downton Abbey. This time when looking at Lady Edith's line (which I find to be a bit too modern to fit in with the rest, but that's not the point here) I found the Patches Blue fabric:

source: https://www.fabric.com/buy/0314288/downton-abbey-lady-edith-patches-blue
And I suddenly realised that this would make a terrific quilt pattern!

So here is a quick and dirty tutorial:


Fabrics Needed

You'll need three different fabrics. One with a beautiful print, two with small ones or solids. I would choose at least one solid fabric, just to let your eyes have a resting point.


Cutting and Sewing

Cut 4" strips WOF from the small prints/solids.

Take one strip each and sew them together lengthwise. Then cut 6" pieces crosswise from the strips. If you're lucky, you'll get 7 pieces from one strip set. But just to be on the safe side, calculate with 6 per strip set when buying your fabric.


Now take two of the pieces, flip one of them and sew them into a rectangular 4 patch.


And that is the first finished block! Once you finished them all, measure them (they should be 7.5"x11.5") and square - or rectangle as the case might be - them up. Only then cut the focus fabric to this size as well. This way you can make sure that you won't have to recut your fabric.
 
And now you have the two blocks necessary to complete the quilt top:


As the focus fabric I chose Kaffe Fassett's Millefiore Blue for this mock-up.
 
 
And here is how the completed top would look like:


As you can see, it's a really fast and easy way of making a quilt. You can choose an equal number of rows and columns and it will still end up as a rectangular due to the form of the blocks. Of course you can also vary the size of the strips at the beginning and make the blocks as big or as small as you want!
 
You can make the cutest baby quilts with this pattern (especially if you have to have it done by tomorrow, because of the last minute invite to the baby shower), or display the colours of your favourite sports team.
 
Maybe even finally cut into that wonderful fabric you bought that is far too pretty to cut into, because it is just so beautiful and you don't really want to cut it up into small pieces (Come on, you know The One, it's been in your stash for a while now and you secretly get up in the night, take it out of your closet, pet it lovingly and whisper breathlessly "My precioussssss!").
 
With these big blocks your fabric will be displayed beautifully!
 
 
Let me know if something is unclear to you. I am happy to help!
 
As always, I would love to see your quilt if you decide to use this pattern.
 
Best,
Cat


Update:  Fellow blogger Preeti Harris actually used this design idea to create an adorable baby quilt. How cool is that?! I felt like Christmas in July!

Here is a sneak peak:


Preeti's Pretty Giraffe Baby Quilt


Head on over to her blog to read Lady Edith rides a Giraffe (how's that for a creative blog post name?!). But be prepared to spend some time there, 'cause you'll find some interesting stuff!