Friday 26 September 2014

I Spy Something Under The Dome


With the second season finale of Under The Dome having aired earlier this week, it seems like the right time to talk about the quilts used in the series.

Looks like Mr. King knows the comfort of a quilt - or at least someone on the set does!


If you haven't seen the series yet, you might not want to read on, as there might be a few SPOILERS!


Season One


The first quilty item I spotted was in the 7th episode of the first season. Norrie's Mother, Alice, is reclining on a quilted pillow? runner? when she is dying. As far as I can tell, it isn't hand-made, but I still thought it's worth a mention.

Alice Dying in Season 1, Episode 7

One episode later, the "four hands" cover the egg with a quilt to hide it in the barn (one must say, that's very inconspicuous - not!). In episode 12 they also transport it to their friend's house with the same quilt. It's a beautiful Bear Claw quilt and by the looks of it, it's seen its fair share of use and washings!

Bear Claw Quilt in Season 1, Episode 12

Interestingly enough, a few scenes later, the quilt is replaced by another one. Was that a simple glitch or actually intended that way? Who knows, but we get to see two different quilts, so I'm not complaining!

Another Quilt in Season 1, Episode 12

This one is mainly made up of different 16 patches, but I can't really tell what the blocks in the middle are. Can you?


Season Two


Sadly, over half of the second season was quilt-free. Or did I miss something quilty?

In episode 10, Norrie and Joe are cuddling under a quilt, as it got colder under the dome. It's a fairly simple design, just squares sewn together. It looks more like something you can buy at Anthropologie & Co., rather than a hand-made quilt.

Norrie under a quilt in Season 2, Episode 10

One episode later, the population of Chester's Mill is huddling up in the High School because of the cold. There are quite a few different quilts and blankets shown:

Quilt Galore in Season 2, Episode 11

Unfortunately, I didn't detect any hand-made quilts in the bunch.


Have you spotted any more quilty items in Under The Dome?

All the best,
Cat.

Friday 19 September 2014

Scales Cushion Tutorial Part 2

This is the second (and last!) part of the Scales Tutorial. The first part can be found here. Also, have a look at all my Black and White Cushions and the corresponding tutorials!

Still Sewing

Last time, we left off at this stage:

The blocks from Tutorial 1

You've measured them and made sure that they're all about the same size, ideally 11.5". Now divide that measurement by two (5.75") and cut the block into four equal squares. Make sure that the black middle square is about 1" big in all four pieces. Cut the other five blocks as well.

Block cut in 4

Now it's time to add the 1" black sashing strips. Put one of the strips under the pressing foot of your sewing machine, then add one of the small squares underneath this strip. Make sure that the black middle square is to the bottom right. Repeat this for 18 of the blocks, leaving 6 without a sashing strip. Then sew these blocks together, keeping them all in the same direction:

Sashing added between Blocks

You'll need two strips of 6 blocks, two of 4 and two of 2 blocks. Make sure the blocks without the sashing strip are at the end of the strip.

Finished strip sizes, two of each

Now you arrange them (counting the blocks in a strip) 2-4-6-6-4-2 on point. Add sashing between the different strips on the longer side of the two joining strips (blue arrows). On one of the middle strips with 6 blocks you'll have to add a sashing strip on both sides (green arrow).

Where to Add Sashing between the Strips
 
First, sew them together in pairs, then sew the different pairs to one whole piece. You can make sure that the sashing strips align perfectly by marking the connecting points and pinning the two sides together.

Press the seams towards the light, so that the sashing strip lies flat on the back.

Pieced Top Finished

Now all you have to do is cut the piece to size (20"x20"). I started off by cutting down the left side of the piece (blue line) and then the top (green). Then I measured 20" on the two remaining sides.

Measure at least twice before you cut and make sure you have nice 90° angles. If you misscut, you might have to start from the beginning again! (No pressure! *lol*)

Cutting Down to Size

And this is how the 20"x20" piece looks like:

Cushion Top Finished

Now you can add a batting of your choice and "quilt it as desired". I kept it simple and just SITD along both sides of the sashing to attach it to the batting.

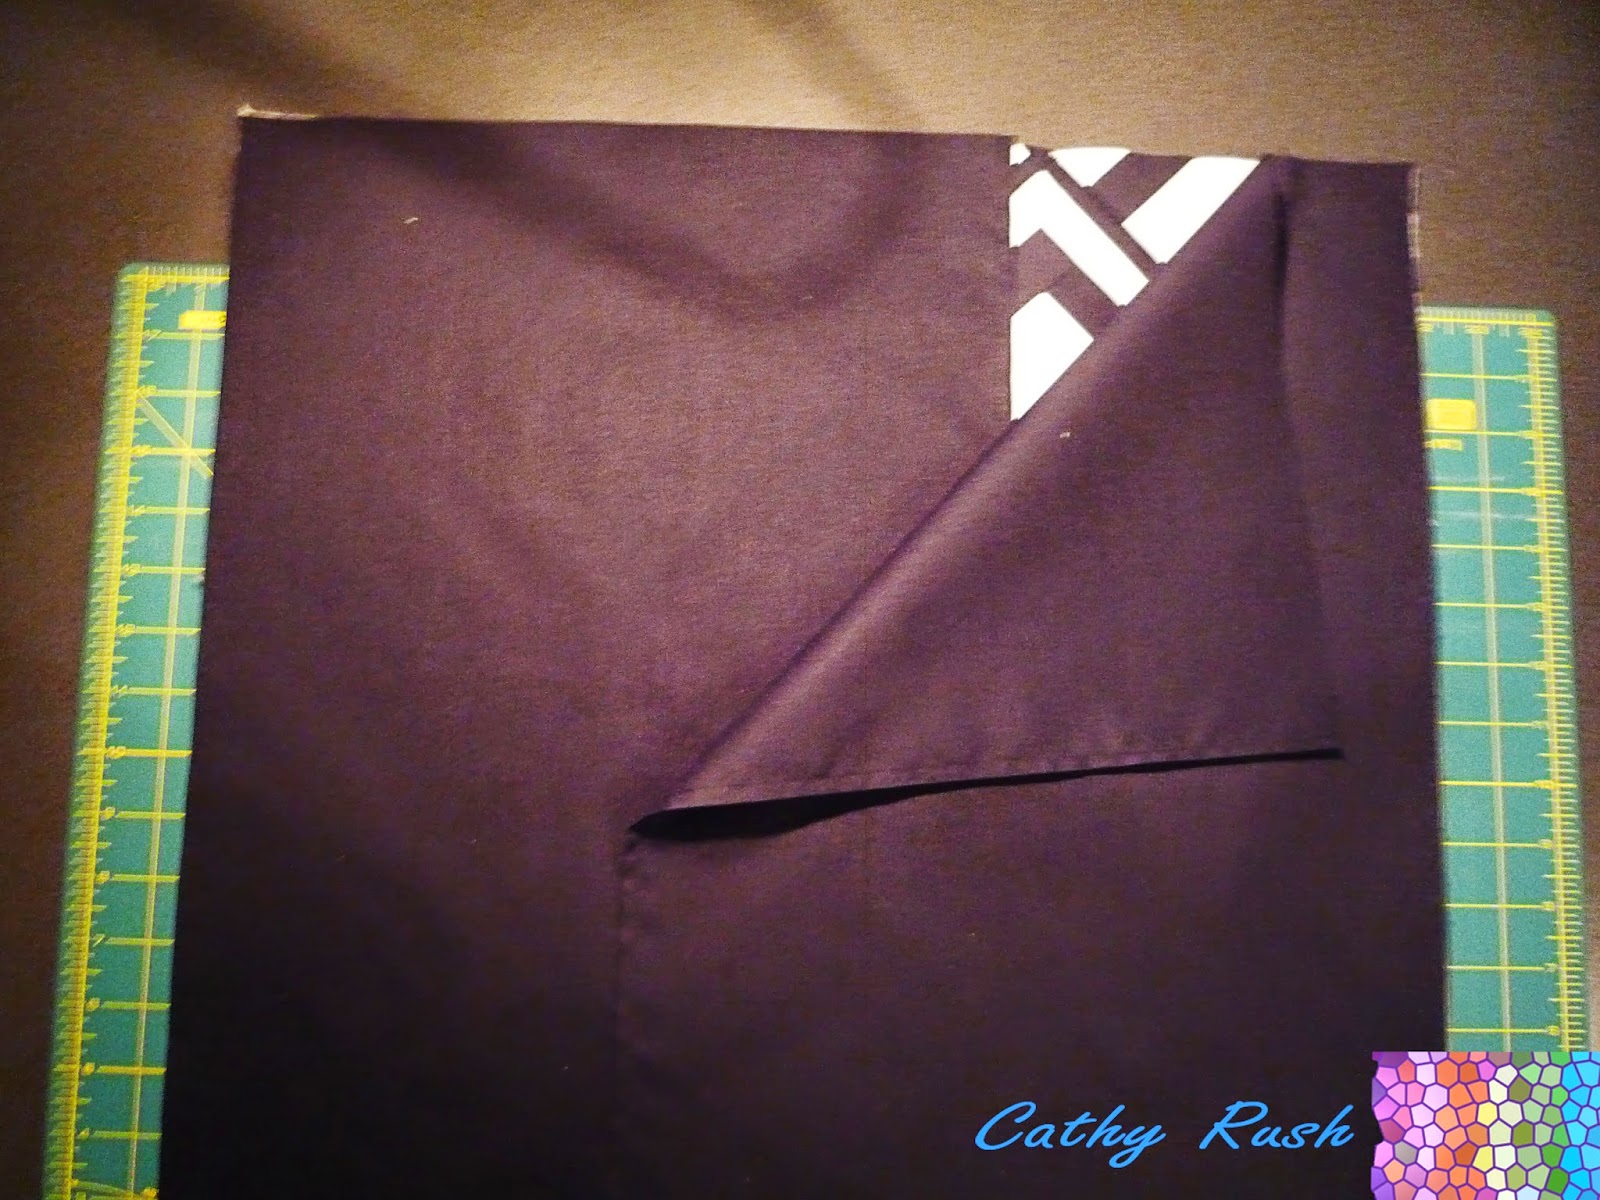
For the back of the cushion cut two pieces the  20"x26". Press them in half (20"x13") and topstitch along the folded line about 1/4" in. Lie the two pieces on top of the quilted Scales piece, so that they overlap in the middle. Stitch along the the outside (also with a 1/4" seam allowance). You might want to go back over and secure the corners and especially the overlap of the two back pieces, as these are the stress points.

Adding the Back of the Case

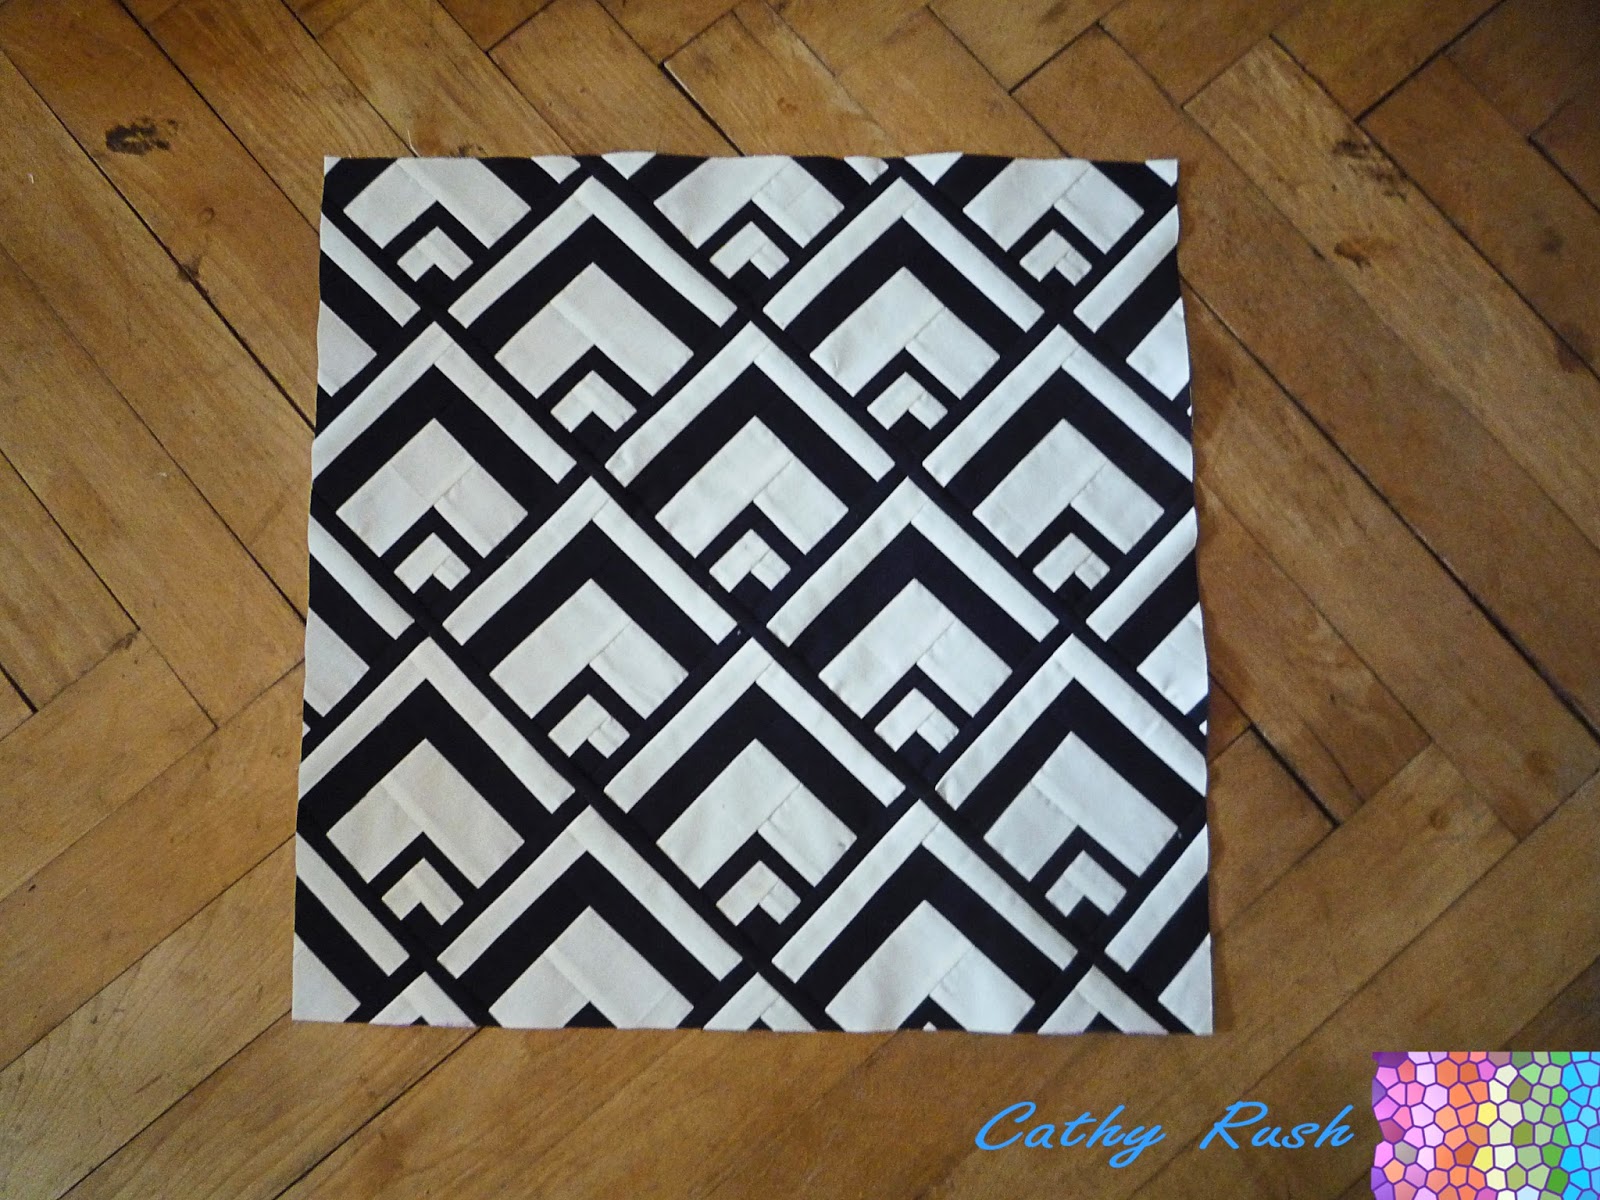
Turn it inside out and put a cushion in it and voilà, here is your finished pillow:

Finished Scales Cushion


Have fun recreating the same or similar pillow cover! And make sure to share it with me!


All the best,
Cat.


Friday 12 September 2014

Falling Waves From Hell

Today I'll tell you about the...(let me count) third quilt I made.

Let's just say: This one wasn't pretty! I basically hated every single step of the process!

Here's a first glimps of the culprit:

Falling Waves Quilt
 Looks innocent enough, doesn't it? If only it were so...


The Fabric


I found different fabrics in the sales bin at my local quilt shop. They were being sold for $5/m - which is a great deal in an area where fabric is sold for $24/m! I bought three fabrics in shades of pink because I thought they would work together nicely. Definitely not my favourite colour scheme, but it was - comparably - cheap!


The Piecing


This quilt was actually all about practice! I planned (and still plan) to make a quilt with HRTs (Half Rectangle Triangles), but they are not that easy to make without loosing all the points. So I decided to pratcise with HSTs (Half Square Triangles).

I used - what could possibly be described as - the traditional way of making HSTs: put two squares on top of each other, sew down the diagonal twice 1/4" from the middle.

I didn't calculate that every two squares sewn together that way would also yield two HSTs and I ended up with far too many! I was planning on a baby quilt, but now it's closer to the size of a lap quilt!

You can imagine that it took me a long, long time to sew them together, press them (half to the dark, the other half to the white) and square them up! I think I went through a whole audiobook. That's over 30 hours!

I was already fed up just looking at them!

Falling Waves in all its Hellish Glory

Then came the sewing them all together part. I hadn't met the 1/4" seam (or just a consistent near 1/4" seam) yet. Need I say more? Nope, it's blatantly clear I did a lot of ripping, re-sewing, re-ripping and re-sewing of these stupid pink fabrics I didn't like to begin with, sprinkled with imaginative swearing, groaning and foot stomping.

That's also when I learned: There's a moment when you just have to let that idea of all perfect points go and move on! And move on I did - quiet happily I might add!


The Backing


Having many leftover HSTs I decided to incorporate same of them in the backing. I decided to go with a strip with an easy heart design. The design and making of the back was probably the most fun part for me. No major hiccoughs either!

Back of the Falling Waves Quilt


The Quilting


Oi vey!

I started off with simple stitch in the ditch - or in my case to the left or the right, over and through the ditch! But it looked a little unfinished so I decided to add a few more lines. Naturally, I didn't really manage to space them evenly. Oh, well, who said it was planned that way anyway?! :P

The Quilting on the Falling Waves Quilt


Of course the whole quilting process didn't go smoothly. Somehow the spare backing and batting got caught in the quilting not once, not twice, but seven times!

More swearing, groaning and foot stomping ensued.

And out came my much used and dearly hated seam ripper!

I don't know why, it never happened before this quilt and never ever after this one (touch wood!).

Let's just say I'm very happy I got this quilt finished (big woohoo!) and bound and stored away!


I still have quiet a few pink HSTs left over in a baggy somewhere. I might pull myself together some time and make a few pillows are mini quilts out of them. Maybe when I'm finally gifting that quilt to someone...


All the best,
Cat.

Friday 5 September 2014

Scales Cushion Tutorial Part 1

Hi there!

Today I'm showing you how I made the Scales cushion case. Here you'll find links to the other tutorials for the cushions.


Fabrics Needed

As with all the cushions in this series, the fabrics you need are black and white. Of course you can use other solids as well, even small prints might work for you.

Cutting...

Cut the following pieces (from top to bottom):


Fabrics needed for Scales Cushion


(6) 2.5" squares in black
(3) 1.25" strips in white
(4) 1" strips in black
(5) 2" strips in white
(6) 1.5" strips in black
(6) 1.25" strips in white
plus (8) 1" strips in black for sashing (not in the picture)

I calculated these measurements for normal 42"-44" wide fabrics, as I worked with wide fabrics when I made this cushion.

...and Sewing

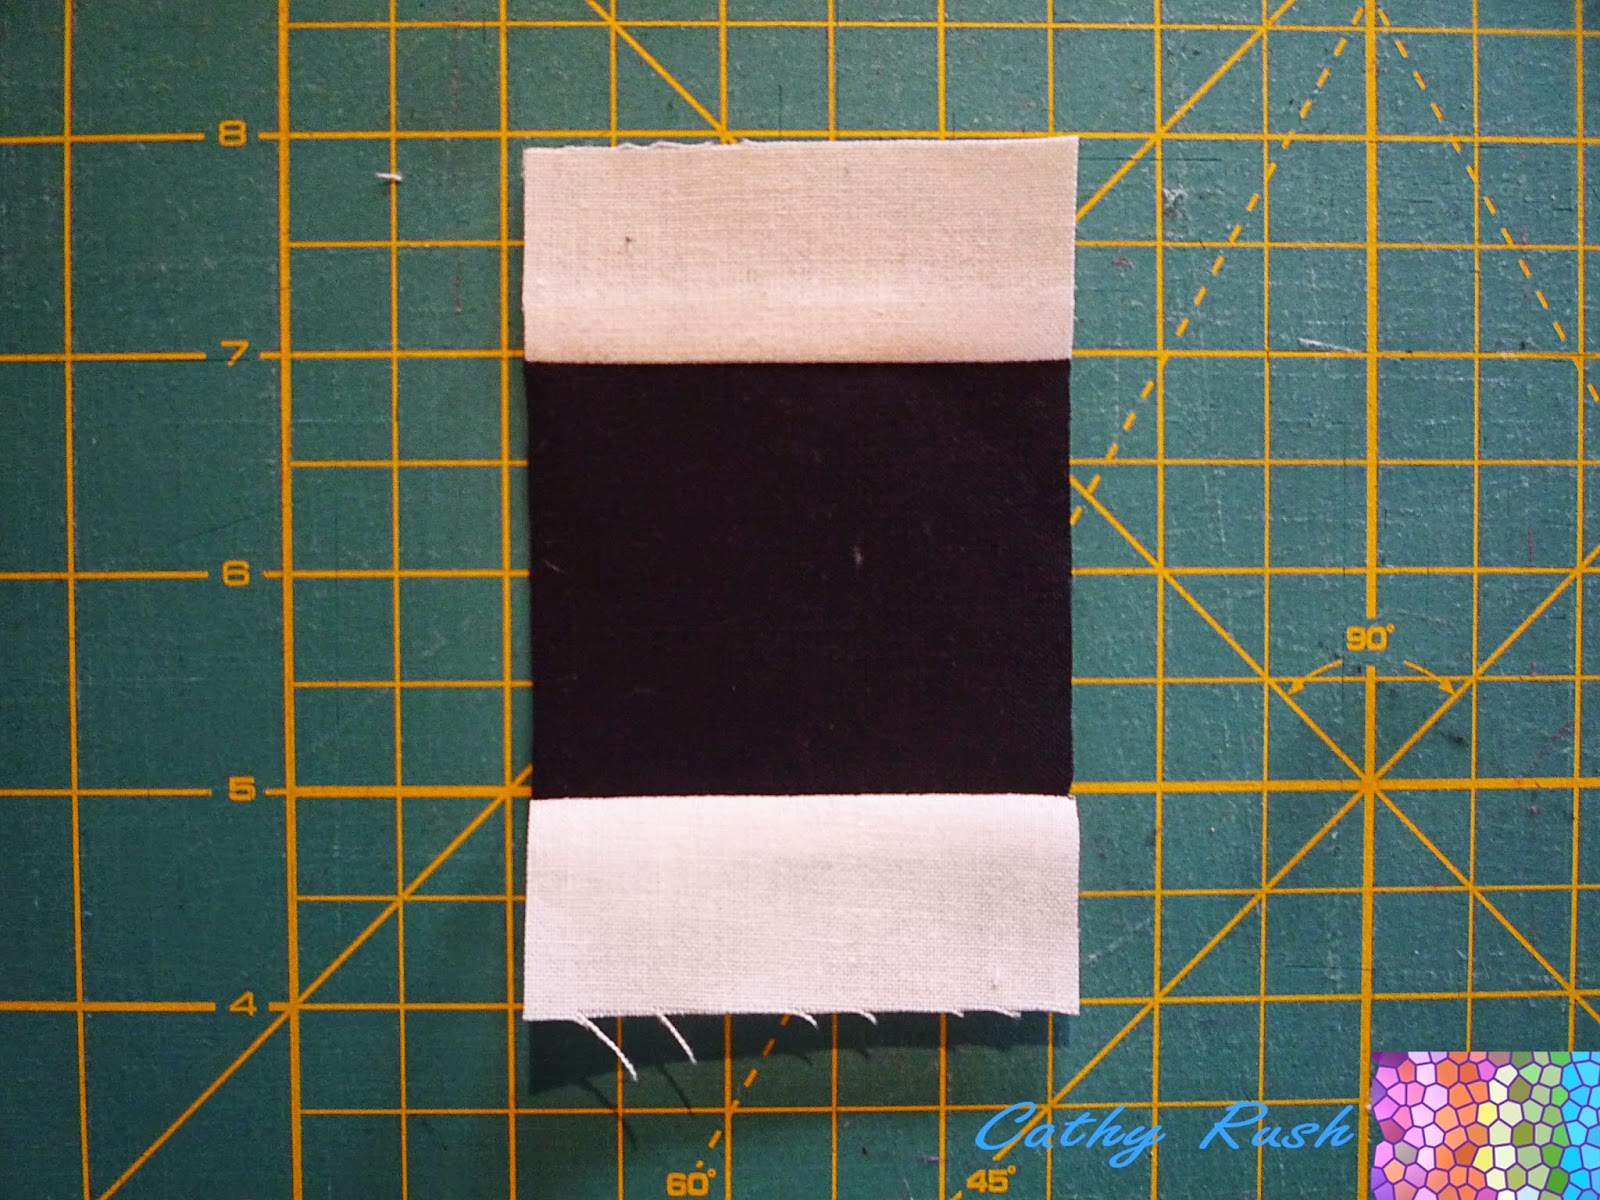
First, take one of the white 1.25" strips and put it under your presser foot. Then take one of the black 2.5" squares and lay it right sides together on the bottom of the strip (as you are working with solids, there basically is no right side). Now you can sew the two pieces together and when you get to the end of the black square, just add the next one with a little gap between them, as is shown here:

"Chain"-piecing the squares

Once you've chain-pieced all six squares, cut them off the strip between the little gap, turn them around and add a white strip on the opposite side as well. Make sure you place them the right sides together underneath the strip! Again sew the strip to all six squares, then cut them loose. Press the strip with the seams outwards and cut back the white strips on the edge if necessary. It doesn't matter if you use scissors or a rotary cutter for that. However, I prefer to use a ruler and rotary cutter, especially if the strips are a bit wider.

This is how your "square" should look like by now:

Squares with two sides added

Now that you come this far, it's basically all boring, boring repetition!

Again, place a white 1.25" strip underneath your presser foot, put the "squares" underneath it and sew on one side of the as of yet black sides, cut them loose, repeat on the other side, then press both strips outwards. Your block should now look like this:

First Round Done

Now take a 1" strip in black and sew it on two sides of the block. Press the seams outwards:

Second Round Halfway Done

Now sew the 1" black strip to the other two sides, again press the seams outwards.

Second Round Done

Proceed by taking the 2" white strips and sew them to the block on two opposite sides, cut them off, press the seams outwards.

Third Round Halfway Done

Add the 2" strips on the other sides as well, pressing the seams outwards.

Third Round Done

Can you guess what you'll have to do next??

Right, take the 1.5" black strips and sew them to two opposite sides of the block, press the seams outwards.¨

Fourth Round Halfway Done

Now of course do the same to the other two sides.

Fourth Round Done

For the last time, take a 1.25" white strip and add it to two opposite sides and press the seams outwards.

Fifth Round Halfway Done

Repeat on the other two sides, cut them off and press the seams outwards.

Now you should have six blocks that look like this:

Finished (?!) Block

Now measure your blocks. They should be around 11.5". Mine were a bit smaller, because I use a 1/4" presser foot with guide and as I can't move my needle (yeah, it's a very basic model, I've been saving up for a new one for a while) my seams are a bit fat. However, as long as they are consistent and you're only sewing for yourself, that's not a problem!

In the next tutorial, you'll learn how to turn these blocks into this cushion:

Finished Scales Cushion


All the best,
Cat.

Thursday 28 August 2014

I Spy With My Little Eye ... Something Quilty!

If you've read the little blurb about me (just look to the right ->), you know that I watch far too many TV series. As in "I could probably do more productive stuff (e.g. sewing :-P) several hours a day" too much! Luckily, I'm a multi-tasker, so I usually watch TV, check my mails, cook and bake (and eat), write this blog and sew. All at the same time.

So while watching one of the countless series, I suddenly had what I call a "brain blitz": Why not combine these two passions of mine?

So just before the fall series start again, I came up with a challenge:


Find all quilty items in your favourite series!


Here are a few examples of quilts in TV that I have already collected:

This Melissa McCall's bed quilt as shown in Teen Wolf.

MTV's Teen Wolf, season 3 episode 7
I'm fairly certain that this is not actually a handmade quilt, but bought. Though it would be easy enough to recreate with triangles in different beige/tan and pink fabrics.


This one is from a fairly old series. Do you remember Fran Fine, the nanny with the very uhm...unique voice?
 
 
The Nanny, season 5, episode 17
In one episode she stripped her senile grandma to give her clothes to rapper Coolio (yeah, those were the times! Does he even exist anymore?).

It's a beautiful sampler quilt in light greys and pinks with a cream background.


I'd much rather be wrapped in this quilt than Coolio's "cool" rapper ski jacket!


The third one I found in a new series (that will be lucky to see its second season, it's just too cliché! Honestly, why can't they come up with at least a somewhat new idea?!) called Young and Hungry.
 

Young and Hungry, season 1, episode 5
It's a very scrappy quilt laying on the two girls' couch. As far as I can tell, it is not actually quilted, but tied with yellow thread, if I'm seeing correctly.

If you want to see this quilt in action, watch the last minute of the season finale!
 
 Soooo...have you spotted any quilts in your favourite series?
 
I for one will most certainly be watching TV with quilter's hawk eyes this coming season. I'll keep you up to date, no worries there!
 
All the best,
Cat


Friday 22 August 2014

Seeing Everything in Black And White - Or My New Cushions

As I have blogged recently, I was working on beautifying my living room / bar / dining room / sewing room (talk about multi-purpose!^ ^). Today, I'm showing you the result.


My couch went from this....

Sad little pre-transformation couch


...to this:
 
Hm, I think we need a bigger couch to fit all the cushions!

This whole room is actually all furnished in black and white.  It wasn't really planned, but once we moved in together with all our random furniture pieces, it just turned out that way. We decided to just go with the flow and have added a few black and white pieces since.

The advantage of a black and white living room is that you can easily pimp it up: Add a few candles and cushions in one colour scheme and it's a different room. Hang up colourful pictures, posters or paintings, and the room is transformed. That's what I've been doing so far. Whenever the mood struck (I call it "spring fever"), I bought a few new candles, a cushion or two and voilà: a new room!

This time I decided to simply keep it black and white. I experimented with a few other colours (mainly red), but simply didn't like the look. I'll probably pimp it up with one or two colourful cushions once spring fever gets to me again and wham! I'll have a new look!

I plan to post the tutorials for the cushions bit by bit on here, so you can recreate them if you want to.


Here are the links to the tutorials:


Tutorial soon to come


Tutorial soon to come!


The only problem I have now: I have so many ideas for more black and white pillows (no, cushions, right? I think I was told that pillows are for the head and cushions for the... uhm, lumbar region?) that I'm running out of space on my couch. I think I need to get a bigger couch...but then I'd need a bigger living room, so basically I'd need a bigger flat, for that I'd need more money, to get more money I'd need another job and...yeah, you see my problem here?!

As always, I'd love to hear your thoughts/questions, so leave a comment (it's open to everybody!).

All the best,
Cat.

Tuesday 19 August 2014

Cushion Tutorial: Black and White Rectangles

Hi there!

Today I'm sharing with you a little tutorial for a cushion cover with rectangles. You could of course also enlarge it for a whole quilt if you wanted.

What inspired me to make this was actually a wallpaper I saw somewhere.


Fabrics Needed

You'll need two different fabrics. I used black and white, but of course you can use whichever two solids you like - or even prints (best would be small prints, as the pieces are too small to see bigger designs).

Cutting and Sewing

Cut 3" strips from both fabrics, then cut them up into 3" squares. It depends on the size of the pillow you need to cover, mine was 50cm x 50cm (20" x 20"), so the instructions are for that size. But you can easily adapt them for your own pillow.

You'll need about 4 strips per colour, which yields at least 50 3" squares (or 100 total).


Lay at least one black and one white square on top of each other (I did it with 2 each, it gets too tough with more than 4 layers for me). Mark the white square both on the top left and the bottom right one inch from the corner (example on the left in picture). Then place your ruler on both those dots and cut the squares in half. If you're using one sided fabric then you need to cut 22 of each fabric as mirror image (example on the right). If you're using solids or any other fabric that looks the same on both side, you can just flip them whichever way you need them to be!


Now lay out your cut pieces by exchanging one side with the opposing colour. You'll need 55 blocks like the one on top and 44 of the one on the bottom.


 To sew them together, pick the two pieces up and overlap them slightly:


I actually eyeballed it, but you can also measure them. Of course, that'll take quiet some time, after all, you're making 99 blocks!

To help you with eyeballing it, here's my tipp: Your needle/seam should go into the angle where the two pieces meet (red line), which should be 1/4" from the straight edge of the two fabrics (blue line).


You can chain piece them all, but make sure you make two different piles for the two different blocks. This makes assembly far easier! Press all seams to the dark side.

Now take one block from each pile and sew them together. Make sure the colours are always opposing. They should nest nicely, so no pinning is needed!


After sewing them all into twos, you should have eleven left from one type of the blocks. Sew them to eleven sets of two.

(For the cushion, I actually sewed them together the other way around,
starting with them bottom ones, see below!)


It's best if you lay out all the columns so that you don't mix them up! Add two sets of twos to another, making sets of four, add them to another set of four, add to each one of the sets of three (Sorry, I forgot to take pictures of that whole procedure).

Remember, you'll need 11 identical columns with 9 blocks each. All of them have to start with the type of block you made 11 more. For example, I always told myself "small black top left corner" as a reminder that I had to start all my columns (and therefore also all sets of two, etc.) with a block that looked like this:


Once you've finished your eleven strips of nine, take them to your ironing board. Press the seams in 5 of the strips towards the top, and the seams in the other 4 strips to the bottom. Make sure they don't bend and stay as straight as possible.

Take a strip each and sew them together. The seams should nest, as the seams go in opposite directions. Repeat 3 times. There's one strip left over. Now add the strip sets of two to another strip set, etc.

You'll end up with a rectangular shape. Cut back all sides symmetrically so that you end up with a square shape:


I added a cotton batting to the back and did some SITD, but, again, that was basically just to attach it, not to add structure. The backing was added as described in a previous post, with two pieces cut 20" x 26".

And that's how it looks like finished:


Front of the Rectangle Cushion


Back of the Rectangle Cushion


I hope the explanations are clear. If not, feel free to ask! :)


All the best,
Cat